19.7.09

ROUND UP #1: HEMS

Hemming is one of the most basic and frequent alterations. In the spirit of building from the ground up, I thought it would be an appropriate subject for my first roundup.

I checked out a few tutorials online, and the following are my favourites for different types of hems:

***

I love doing hems by hand. There's something nice about taking a little handsewing break, especially if you've been fighting with your machine (a frequent occurrence in my life).
The first two links show a similar stitch (I usually use the first method), and the third is a bit of a quickie. Make sure you take an extra stitch (or knot your thread) now and then, so that if part of your hem breaks, you don't have to repair the whole thing.

SewForDough: Hand Sew a Hem


The Sewing Divas: Hemming Stitch by Hand


Craftzine: Quicker Hand Blind Stitch


A blind hem can also be accomplished on a machine, but it's not nearly as good. It's more appropriate for pants or thicker fabrics. When you do a blind stitch by hand, you can really pick up only one thread, rendering your hem truly invisible. On a machine, a lot more is picked up and you end up with a small vertical stitch every inch or so. Still, if you're doing a huge panel of drapery or something, go with the machine stitch!

Threadbanger: Blind Hem by Machine


Normally when I hem jeans, I just fold over the edge twice and sew it with a nice heavy jeans thread. But I do mourn the loss of that special, unreproducible look of an original jean hem. Here's an interesting way to preserve the original hem. (Oh, apparently it is known as a "Euro Hem". How fancy.)

Sidenote: I love my Jean a ma jig. It's so simple yet brilliant. Keeps your machine from getting angry and skipping stitches when you go over the bulky seams in jeans.

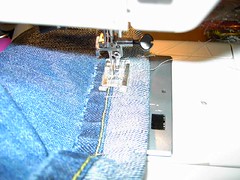
Dacia Ray: Jeans Hem


A narrow hem is lovely in a fine fabric. Both of these techniques use guide stitches to help you fold such a small edge accurately. The second technique adds an extra step of stitching and trimming to achieve a super narrow hem, and is perfect for slippery, hard to control fabrics.

Chickpea: Narrow Hem


Marcy Tilton: Calvin Klein Hem


Rolled hems are even smaller and finer. They can be done by hand or by machine. I must admit, I have never had fun doing a rolled hem by machine. They're much easier with a stable fabric. Chiffon will make you crazy, and I would definitely pick a hand-rolled hem if faced with that prospect.

The Sewing Divas: Machine Rolled Hem


Colette Patterns: Hand Rolled Hem


If you have to hem a corner, a mitered finish is a really nice touch. It reduces bulk and just looks so tidy and professional

Burda Style: Mitered Hem (simple)


Craft Stylish: Mitered Hem (in depth)


Special cases require special measures! Sew For Dough has some great tutorials for doing tapered or flared pants, as well as hemming stretchy fabrics.

If you have any other links to share, please post them in the comments.

Happy Hemming!

Sewing Skewl Tip #1: Dominant seams

When constructing a sleeve, there are two common approaches:

1. Leaving the side seam of the bodice and underarm seam of the sleeve open, sew the sleeve cap to the armscye (right sides together). Then stitch the side seam and and underarm seam all in one go, lining up the armscye seam.

2. Assemble the side seam of the bodice and underarm seam of the sleeve. With bodice inside out, and sleeve right side out, place sleeve inside bodice and sew around the armscye, lining up the side seam with the underarm seam.

I always thought that it was just personal preference that would make you choose one method over the other, but there is actually a difference. Basically, the seam that you sew last ends up being the dominant seam and can subtly affect the way a garment falls. Choosing method #1 is appropriate in a work shirt or t-shirt (with a flatter sleeve cap) where a full range of motion is required. Method #2 is used for tailored jackets and closer fitting tops (with a higher cap height).

The same principle works for pants. When I first learned to sew, I would sew the crotch seams of the front and back first, then the outside seams and then the inseam in one line. We recently sewed shorts in school and the instructions were just the opposite. Here we sewed the outseam and inseam of each leg, then - like method #2 of the sleeve construction - we were directed to place one leg inside the other and sew the crotch seam from front to back, lining up the inseam along the way. This makes the pants "stand up straight" if you will.


Click on image above to view larger

UPDATE:
The lovely and talented Kathleen from Fashion Incubator has illustrated this point rather dramatically when applied to linings and facings. I strongly suggest you check out her post here.

17.7.09

Recycled dress (and shrug)

The setup:
I found a huge duvet cover at the Salvation Army for $4 and figured it would make a pretty cute dress. I was figuring on a basic sleeveless style with an a-line skirt.

The pattern:

New Look (will update with the number)
Not that it matters, it ended up FAR from the pattern.

The fabric:

100% cotton recycled duvet cover

The issues:
Numerous. Mainly due to poor size/fabric selection for the pattern.

The process:
Now I've read many times that when you have more than a B cup, you should take the size that corresponds to your high bust measurement (above the fullest part of your bust) because it will better fit your shoulders and neck. Then you can do a full bust adjustment (FBA). According to this pattern, I think I was a 10 in the high bust/shoulders, a 12 in the waist and a 16 in the hips. So I chose the 12 in the top and blended to the 16 in the hips. As it turns out, I really should have picked the 10 in the top. Shoulders were way too big. Also, the FBA method was not quite right. I've since purchased a book on fitting that I hope will help for next time.

Here's what I did:
1. Made existing bust dart bigger through improvisational FBA
2. Added second side dart to get rid of excess waist weirdness
3. Added waist seam to get rid of the rest of the waist weirdness
4. Made strapless to deal with too-big shoulders.
5. Added straps to deal with fear of straplessness.
6. Used bias tape everywhere I could (hem, top, straps, waist)
7. Ended up with completely different dress from pattern.


As for the shrug, I followed this tutorial from Craft Stylish. Ruffles aren't really my thing though, so after I cut out the basic shape of the shrug, I serged the edges, turned them under and stitched with a regular straight stitch. DO NOT STRETCH the fabric, or you will end up with wobbly lettuce edges. These edges will not be subjected to stretch, so you really just want them to lay flat.

The result:
I guess I'm happy with the dress, but it took too much fussing about. Time to seriously get around to making a sloper so I can spend less time making silly adjustments.

On the other hand, the shrug was so simple and awesome. I love a shrug. I suspect I will soon have many more (and maybe a few less T-shirts).

12.7.09

On a mission

And so begins another attempt at frequent, productive and interesting blogging.

Perhaps a good old-fashioned definition of intentions will help it stick. Here goes:


The purpose of this blog is to:


Document stitchery-related items of interest both for personal reference and to participate in an active online community.


These may include, but are not limited to, the following:

a) Sewing projects undertaken by the author (including for contribution to other groups such as Wardrobe Refashion).

b) Sharing helpful tips learned in sewing school.

c) Compiling roundups of tutorials found online.

d) Researching and profiling ways to contribute to social development through craft/artisanship (through organizations and other projects).