
Today in class our teacher showed us a way to take in a pair of pants (or a skirt) without...well...taking them in. I mean, without taking off the waistband, taking in the side seams, shortening the waistband and then putting the whole mess back together again. No darts either. Nope. No stitch ripper to be seen here. How is this possible you ask?
THE MAGIC OF STEAM!!
Some of you may be nodding knowingly already. Maybe you are fondly remembering when you first discovered this trick. If not, dear fellow sewist, read on.
~ Stick with me...it's a long one but a GOOD one!~
As someone with a large waist/hip differential, I find myself laden with clothing items that fit my hips and are way too big at the waist. I hate wearing belts because they add bulk where I really don't need it. So what do I do? Well, up until now, I was just sad. But now! Now!!!
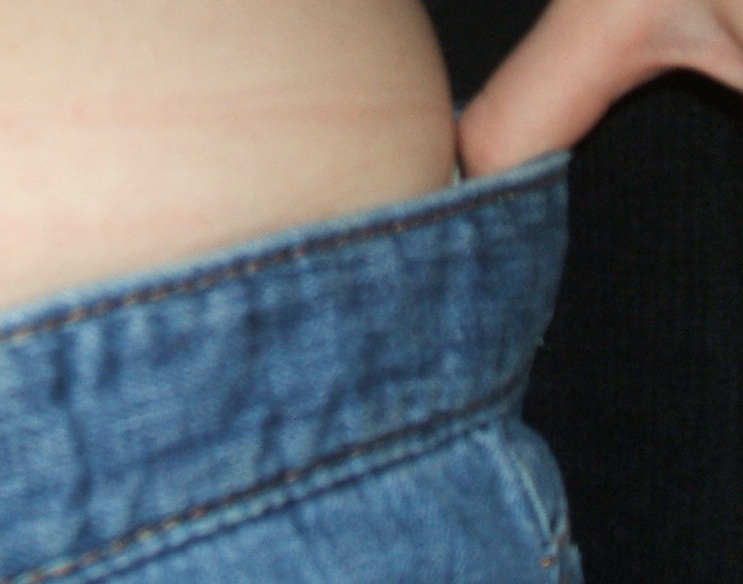
Here are the pants I was wearing today. Believe me, I'm not keen on showing any portion of my midriff on the internet, but for the cause I will suck it up (but not suck it in - much).

They're too big! They generally feel fine for an hour or so after they come out of the washer and dryer but by the end of the day are so big I barely need to undo them to take them off. All of my jeans are like this.

*Pssst!* They'll end up like this!
Shall I get to the point?
Ok, ok. So what I did was STEAM the waistband until it got smaller, and then held it in place with a couple of lengths of twill tape. EASY! Here's the whole process.
A caveat: This will likely only work on natural fibres that respond to steam shaping. If you want to do this with a synthetic, you could try skipping ahead to step 2, you just won't be able to get rid of as much excess. With washable fabrics, save yourself some time and effort and wash and dry them as you normally would before beginning.
Step 1: Shrink out the excess
Put the pants (or skirt) on and determine how much excess you have to get rid of. When I pinched my waistband as above, I figured I needed to shrink it down by about 3" total.
Take off the pants and measure the waistband. You'll check your progress against this number.
(If you've just taken them out of the washer/dryer, you may be able to skip all of this steaming business and go straight to step 2).


Half my waistband measured about 17 1/4".
So my goal is to shrink out 1 1/2" (1/2 of 3") to get that measure down to 15 3/4".
We'll see about that.
Start by pinning a section of the waistband to your ironing board. At school we have a fancy schmancy steam press like at the drycleaners with an amazing pinnable surface and a vacuum that sucks away the steam at the end and dries out your fabric quickly. Not so at home.

In order to keep the jeans in place on my not-so-pinnable ironing board, I stuck pins in from all directions. The idea is to hold them so there is a bump as above. We're going to try to steam that bump flat.

With the highest steam setting, tap down on the waistband with the iron. This is pressing, not ironing, so no back and forth action. Just up and down. If you have a button on your iron that gives you a shot of steam, all the better. Keep steaming until you've managed to get the waistband flat.

Like this! Cool, hey?
To keep the waistband from stretching back out again as soon as you pick it up, you have to make sure it is dry, and not still all full of steamy moisture. (This is a general pressing principle, by the way. All will be lost if you consider your pressing done when the item is still damp). If you can go back and forth between steam and dry iron settings, that can help. You can also use a clapper, or a piece of wood, or an ironing ham to get rid of the excess moisture.

Smack that steam out!
Now, work your way around the waistband in small sections, shrinking as you go. This, as it turns out, is easier said than done on a thick denim waistband. Our teacher did the demo on a thinner, cotton, cargo type fabric and it worked like a charm.

But with thick denim, I ended up with a lot of this bulky bumpy action.

I tried to smooth out the bumps, but I think I smoothed out the shrinking at the same time.
It took me a couple of rounds to get some good shrinkage, and along the way I found a good technique:

Hold onto a part of the jeans with the butt of your iron, then...

With your other hand, smoosh the upcoming waistband under your iron and steam away.

You may also find that a damp presscloth is helpful. Just don't forget to make sure the section is dry before moving on!

It can also help to work from both sides.

In the end, I managed to shrink out 3/4" of the folded waistband (1 1/2" total). Not bad, but I wanted to get rid of twice that!
It's ok, there's a whole other step.
Of course, the steam shrinking is not going to just stay like that forever. With wearing, the waist will stretch right back out. The solution is now to stitch on a length of twill tape or something that will not stretch to keep the shape we've just worked to hard to make.
Step 2: Keep it in place

Place the twill tape along the lower edge of the waistband. Your bobbin thread should match the colour of your jeans to blend in. You can start sewing just after the zipper in the front (i.e. 1 1/2" or so away from the edge of the waistband). Backstitch a few stitches to stabilize.

Now pull your twill tape taut (not too hard now, just taut), and sort of smoosh the jeans towards the presser foot. This will enable us to ease that extra 1 1/2" of waistband onto the non-stretchy twill tape. It's important not to force your fabric or your machine, you don't want to break a needle, so the pushing and pulling should be gentle.
(PS - do not substitute bias tape for twill tape. It will stretch and all will be for naught).
Now, my machine admittedly did not enjoy this process. She's an old refurbished Brother with a bit of a wheezy motor. So there were quite a few times I had to do the push/pull with one hand and move the fly wheel with the other. For goodness sake use a good heavy #14 needle and a fairly long stitch for this business.

You don't want to sew over your belt loops like I did. (Only one!)

Stop before the belt loops and backstitch. You'll know the belt loops on the backside by the bar tacks holding them on. Then just skip over the belt loop and start again on the other side, backstitching again.

Then you can just snip off the threads when you're done.
I put a length of twill tape at the top and bottom of the waistband to better hold it in place. You could even stitch on either edge of the twill tape - or use a narrower twill tape.

Now, I was so excited about putting these on that I neglected to do anything about the raw ends of the twill tape. I left about an inch or so unsewn that I plan to turn under and hand stitch in place. I may even hand stitch those parts where I skipped over the belt loops.
Pants that fit!

Too big no more!
26 comments:
It's like having a belt INSIDE your pants!
awesome
Ok, this is genius. Thanks for explaining it!
Saw your post over on Wardrobe Refashion and was intrigued - how fantastic! Thanks so much for the tutorial! It will certainly be useful.
Genius! Thanks for this precise and super useful tutorial! I have the same problems with my pants and I hate to take them in at the waist. Now I can do it so easily.
This was a great tutorial. I have the same problem with 'fits in the hips, to big in the waist.' I cannot wait to try this trick on my jeans, and some cords that I picked up from the thrift shop.
Also linked from Wardrobe Refashion. Thank you! Over half of my pants need treatment like this, and I haven't had the guts (or experience) to rip out the waistband.
yay, yay, yay!!!! Thanks for sharing! you've just opened up so many possibilities at the thrift!
As one who also shares that ridiculous hip/waist ratio - I hoist my pants up to you!
Bravo!
Thank you, thank you! I'd been slashing an opening on either side of the inside casing and running a length of elastic through it (like the adjustable waist pants my kids have)- I like this ever so much better! No more goofy "ripples" along the backside. (Because seriously, if I wanted to wear elasticized waist pants - I'd buy 'em that way!)
Found you via Wardrobe Refashion. I'm still trying to wrap my head around the awesomeness of this tutorial. I'm ready to convert to the good gospel of waistbands that fit. Hallelujah!
OH, this is awesome. Thank you for such a fantastic tutorial. Now...to go find some twill tape. You have shot a ray of hope into my poor-fitting jeans life.
Wow!
Im also from Wardrobe refashion. As soon as i get my hands on some twill tape, I have 4 pair of pants that need this.
thank you for posting this.
yaaaaayyyyyyy!! No more pants sliding off my backside!! I cannot WAIT to give this a go!!!!
do you preshrink your twill tape? I think I might -- just to be safe!!
Amazing!! What a great idea!! It sounds like a lot of us suffer from lush hips and tiny waists - now we can have pants that won't slide south!
Angela Pea
Wow! This is fantastic. Thanks so much for taking the trouble to make a tutorial for us.
Thank you for the tutorial! I have a pair of jeans that I can only wear for a couple hours before they start to slide off. I can't wait to try it.
Can I just say-- FABULOUS!!! Thanks for sharing!
Thank you so much for this tutorial! You are a rockstar!
Oh heavens how wonderful: but oh how I wish I needed this trick!
I've done it on two pairs of jeans the hard way, one by adding darts and the other by ripping out quite a bit of waistband in the back and then running an ease line, A whole nights work. You can bet I'll do it your way next time! Mine are usually a perfect fit right out of the dryer so I can go right to the twill tape step. Yay! Thanks for this.
I actually read this with my mouth open. I can't wait to try it out on my trousers. Too bad I'm at work now and have to wait to get those jeans nice and tight!
great idea - and really nicely explained. wonder when i'll ever get to put this great idea to use?
What a brilliant technique! (Especially considering it can easily be reversed again if needed...)
Thank you for sharing!
this looks amazing. hope to try it!
Awesome! I've lost a lot of weight recently, and the pile of jeans and other clothes waiting waistband reduction is suddenly looking much less daunting! Thanks for sharing this :)
thank you for the sewing lesson; i never knew this and it is something i really need...almost all of my jeans do this and i get that round waistband pooch out in front, or that sticking straight up pooch in the back waistband, lol :D i don't have any twill tape..i wonder if some kind of ribbon would work until i buy the twill tape. i feel so much better; now i can keep (and wear!) more jeans...
kudzu
Post a Comment